

Introduction:
What is a Granny Square?
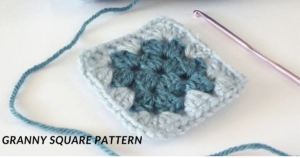
A Granny Square is a classic crochet motif that’s been popular for generations. It typically starts with a small square crocheted in the center, often with a ring or chain loop, and then additional rounds are worked around it to create a larger square. The square is formed by working sets of double crochet stitches, often separated by chain stitches, into the center and around the edges.
Granny Squares are incredibly versatile and can be used in various projects such as blankets, afghans, clothing, accessories, and home decor items. They can be made using different colors, yarn weights, and stitch patterns, making them a favorite among crocheters for their simplicity and adaptability.
Uses and versatility of Granny Squares
Granny squares are a classic crochet motif that has been used for decades to create a wide range of projects. They are incredibly versatile and can be used in various ways:
- Afghans/Blankets: Granny squares are often used to make afghans or blankets by stitching multiple squares together. This allows for endless color combinations and patterns.
- Clothing: Granny squares can be used to make clothing items such as sweaters, cardigans, vests, skirts, and even hats. Mixing and matching different colored squares can create unique and personalized garments.
- Home Decor: Granny squares can be used to make home decor items such as pillows, cushion covers, table runners, coasters, and placemats. They add a cozy and vintage touch to any room.
- Bags and Purses: Granny squares can be stitched together to create bags, purses, tote bags, and even backpacks. They are sturdy and durable, making them perfect for carrying everyday essentials.
- Accessories: Granny squares can be used to make a variety of accessories including scarves, shawls, gloves, mittens, and even jewelry such as earrings and necklaces.
- Children’s Toys: Granny squares can be used to make soft toys, baby blankets, and even baby clothes. Their colorful and playful nature makes them perfect for children’s items.
- Seasonal Decorations: Granny squares can be used to make seasonal decorations such as Christmas stockings, Easter baskets, Halloween decorations, and Thanksgiving table runners.
- Patchwork: Granny squares can be used as patches to mend or embellish clothing items or home textiles. They can also be sewn onto bags, hats, or even shoes to add a touch of color and personality.
- Upcycling Projects: Granny squares can be made from leftover yarn scraps, making them a great way to upcycle and reduce waste. They can be used to revamp old clothing or accessories, giving them a fresh and modern look.
Overall, the versatility of granny squares makes them a beloved choice for crafters of all skill levels, from beginners to experienced crocheters. They offer endless possibilities for creativity and can be adapted to suit any style or preference.
Materials Needed
- Yarn
- Crochet Hook
- Scissors
- Yarn Needle
Basic Stitches Used
The basic stitches used in making a traditional granny square pattern include:
- Chain (ch): This is the foundation of most crochet projects. It creates a base from which you’ll work subsequent stitches.
- Single Crochet (sc): A basic stitch that creates a dense fabric. It involves inserting the hook into a stitch, pulling up a loop, and then pulling yarn through both loops on the hook.
- Double Crochet (dc): A taller stitch that creates a more open fabric. It involves yarn over, insert hook into stitch, yarn over and pull up a loop, yarn over and pull through two loops on the hook, yarn over and pull through remaining two loops on the hook.
- Slip Stitch (sl st): A technique used to join rounds or stitches together, or to move the yarn across the work without adding height.
These stitches are typically used in combination to create the classic granny square motif. The exact pattern may vary, but it often involves clusters of double crochet stitches separated by chain stitches to create the characteristic “gaps” or “holes” in the square. By varying the number of stitches and chains between the clusters, you can create different looks and textures within the granny square pattern.
Instructions:
Start with a Slip Knot:
Begin by making a slip knot on your crochet hook. To make a slip knot, create a loop with the yarn, then pull a strand of yarn through the loop to form a knot. Slide this knot onto your crochet hook and tighten it to secure.
Chain 4 Stitches to Form a Ring:
After creating the slip knot, chain 4 stitches. To make a chain stitch, yarn over (wrap the yarn around the hook from back to front), then pull the yarn through the loop on the hook. Repeat this process three more times, until you have a chain of 4 stitches. Once you have chained 4 stitches, slip stitch into the first chain to form a ring.
Round 1:
Chain 3, which will count as your first double crochet (dc). Then, work 2 double crochets into the ring. To make a double crochet, yarn over, insert your hook into the center of the ring, yarn over again, pull up a loop (you should now have 3 loops on your hook), yarn over, pull through 2 loops, yarn over again, and pull through the remaining 2 loops.
Chain 2. This chain-2 space will form the corner of your square.
Work 3 double crochets into the ring. This forms one cluster.
Chain 2, then work 3 double crochets into the ring. Repeat this sequence three more times. After the final chain-2 space and cluster, chain 2 again.
Slip stitch into the top of the beginning chain 3 to join the round. This completes Round 1, and you should now have a small square with 4 clusters of 3 double crochets, separated by chain-2 spaces.
Round 2:
Slip stitch across to the first chain-2 corner space.
Chain 3 (counts as first double crochet), then work 2 double crochets into the same chain-2 space.
Chain 2, then work 3 double crochets into the next chain-2 space. This sequence forms another corner of the square.
Repeat Chain 2, 3 double crochets in the next chain-2 space three more times, working around the square.
After the final corner, chain 2 again, then slip stitch into the top of the beginning chain 3 to join the round. This round should now have 8 clusters of double crochets separated by chain-2 corner spaces.
Rounds 3 and Subsequent Rounds:
Continue working in a similar manner for each subsequent round. Each round will have 4 more clusters than the previous round, and you will create new corner spaces at each corner of the square.
To begin each new round, slip stitch across to the first chain-2 corner space. Then, chain 3 (counts as first double crochet), work 2 double crochets into the same chain-2 space.
Chain 2, then work 3 double crochets into the next chain-2 space. Repeat this sequence around the square, creating corners with chain-2 spaces and clusters of double crochets along each side.
After completing each side and corner, chain 2 and slip stitch into the top of the beginning chain 3 to join the round.
Finishing:
Continue working rounds in this manner until your granny square reaches the desired size. You can change colors after any round to create different effects. Once your square is the size you want, fasten off the yarn by cutting it, leaving a tail, and pulling it through the loop on your hook. Use a yarn needle to weave in the loose ends on the back of your work.
Remember, the granny square pattern is versatile and can be modified in many ways to create different effects. Experiment with colors, yarn weights, and stitch variations to make unique granny squares for blankets, pillows, bags, and more!