

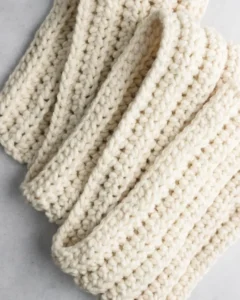
Are you curious about the delicate technique of crocheting a scarf? If the answer is yes, you’re fortunate since this complementary pattern was deliberately made with novices in mind. The ribbed scarf design is a gentle introduction to the fascinating world of crochet, offering a fun and gratifying experience for newcomers.
Whether you’re new to crochet or looking for a quick and easy project for a thoughtful gift, this scarf pattern is ideal for you. When finished, the scarf will wrap around you in a cocoon of plush softness, providing unparalleled comfort and warmth during cold weather spells. The beauty of this pattern lies in its adaptability; you can choose your favorite yarn color and add decorations.
Don’t hesitate any longer! Seize the opportunity to embark on this delightful crocheting journey. Gather your hooks, select your yarn, and let your creativity flow as you bring this charming pattern to life. Whether you’re crafting for yourself or gifting to a loved one, the satisfaction of creating a handmade masterpiece is unparalleled. So, without further delay, let the rhythmic motion of crochet stitches weave magic into your scarf-making endeavor.

Easy Crochet Scarf Pattern
This modern, gender-neutral scarf design is tailor-made for beginners, employing just two fundamental stitches: the versatile chain stitch and the half-double crochet stitch (DC). With our detailed guidance, you’ll effortlessly navigate from the initial chain stitches to the finishing touches of adding a stylish fringe.
Whether you’re looking to expand your crochet repertoire or simply seeking a quick and satisfying project, this scarf pattern is the perfect choice. What’s more, it comes together swiftly, requiring only approximately 2 hours to complete from start to finish, making it an ideal option for those with busy schedules or limited crafting time.
Once you’ve mastered the art of crafting this chic ribbed scarf, why not explore further? Consider branching out to create an array of crochet accessories, from cozy hats to trendy headbands or snug cowls. The possibilities are endless, and your crochet journey is just beginning!
Materials Needed:
Here are the materials you’ll need for this project:.
- Super bulky yarn
- Size N / 9mm crochet hook
- Crochet Needle (like a blunt-tipped tapestry needle)
- Scissors
- Measuring Tape
Scarf Pattern Variations
Scarf patterns can vary widely depending on the style, technique, and yarn used. Here are some common variations:
- Basic Knit or Crochet Scarf:
This is the simplest scarf pattern, typically worked in either knit or crochet stitches. It’s a great starting point for beginners.
- Ribbed Scarf:
Ribbing creates a stretchy fabric that lies flat and is reversible. This pattern alternates knit and purl stitches in a regular sequence.
- Cabled Scarf:
Cables are created by crossing stitches over each other, creating intricate designs. Cabled scarves add texture and visual interest.
- Lace Scarf:
Lace patterns feature decorative, often openwork stitches that create a delicate and airy fabric. They’re great for lightweight scarves.
- Colorwork Scarf:
Colorwork involves using multiple colors of yarn to create patterns or images. Fair Isle and intarsia are two common techniques for color-work scarves.
- Striped Scarf:
Striped scarves are simple to make by alternating colors or yarn types to create stripes. They can be made using any stitch pattern.
- Infinity Scarf:
An infinity scarf is a closed loop that can be worn double around the neck. It can be made in any stitch pattern and can vary in width and length.
- Fringe Scarf:
A fringe can be added to the ends of a scarf for a decorative touch. It can be made from the same yarn as the scarf or a contrasting yarn.
- Chunky Scarf:
Chunky scarves are made using thick yarn and large needles or hooks, resulting in a cozy and warm accessory.
- Textured Scarf:
Textured scarves use a variety of stitches to create a tactile fabric with depth and interest. Examples include seed stitch, basket weave, and moss stitch.
- Reversible Scarf:
Reversible scarves look the same on both sides, making them versatile and easy to wear. Ribbing, garter stitch, and certain cable patterns can be reversible.
- Brioche Scarf:
Brioche stitch creates a lofty, reversible fabric with a distinctive ribbed texture. It involves knitting or purling together stitches with yarnovers.
These are just a few examples of the countless scarf patterns and variations. Depending on your skill level, preferences, and the occasion, you can choose from a wide range of designs and techniques to create a scarf that’s perfect for you or your intended recipient.
Chunky Scarf Crochet Pattern
Pattern Description
- Level: It is also for Beginner to advanced
- Size: The best size is 66 long and 6 wide for an adult-size scarf.
- Gauge: It should be 7.5 sets per 4 inches in HDC BLO
Materials
- Yarn: 2 skeins Lion Brand Wool-Ease Thick and Quick (Category 6), or another super bulky weight yarn
- Crochet Hook: N/M 9 mm hook, or whichever size hook you need to meet gauge
- yarn needle or tapestry needle
- scissors
- stitch markers, if desired
- ruler or tape measure, if desired
Scarf Pattern Procedure
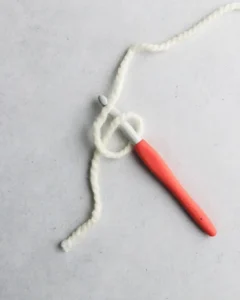
The first step is to tie a slip knot. You’ll use the slip knot to attach the yarn to the crochet hook.
How do I tie a slip knot?
- Begin by creating a loop with your yarn, ensuring that one end extends about 6 inches for your tail.
- Insert the crochet hook through the center of the loop, starting from the front and working towards the back.
- With the hook inside the loop, grasp the yarn coming from the ball and pull it up through the loop, forming a new loop on the hook.
- Adjust the size of the loop by gently tugging on both ends of the yarn, making sure it’s neither too loose nor too tight.
- Once you’ve achieved the desired size, secure the loop by pulling both ends of the yarn firmly, cinching the slip knot snugly around the hook.
- Your slip knot is now ready, and you can proceed with your crochet project, confident that your foundation is securely in place.
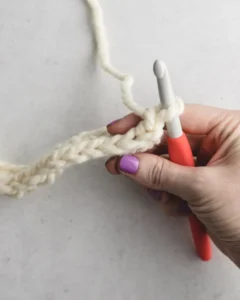
Let’s dive into the first essential step of crafting your crochet scarf: creating the starting chain. This initial chain, also known as the foundation chain, lays the groundwork for the entire project.
To form your starting chain, follow these steps:
Inserting the Hook: Begin by inserting your crochet hook into the slip knot you’ve created. This knot serves as your starting point.
Yarning Over: Wrap the yarn over your crochet hook from back to front, creating a loop around the hook.
Pulling Up a Loop: With the yarn wrapped around the hook, gently pull it through the slip knot, creating a new loop on your hook.
Repeating the Process: Continue this sequence to produce more chain stitches. Each time you yarn over and pull through, you’re adding another link to your chain.
If you find yourself chaining too tightly, consider using a larger hook size, such as 10mm or 12mm, for the initial chain stitches. Once you’ve completed the starting chain, you can switch to a smaller hook, like a 9mm, for the remainder of the scarf.
For this particular pattern, we aim to create a starting chain comprising 126 stitches. Remember, when counting your chains, exclude the loop currently on your hook and the slip knot; these do not count as stitches.
Beginner Tip: To ensure an accurate count of your chain stitches, refrain from including the loop on your hook or the slip knot in your tally. This practice helps maintain consistency throughout your project.
By mastering the art of the starting chain, you’re laying the foundation for a beautifully crafted crochet scarf. Enjoy the process and the creativity it brings to life!
PROCEDURE PERFORM
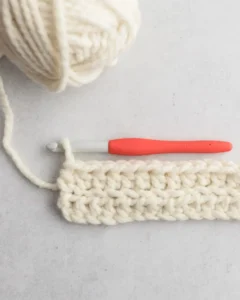
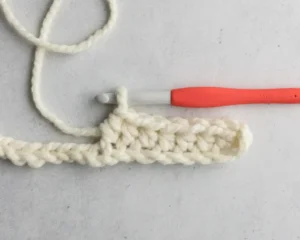
Row 1: Begin your scarf by creating the foundational row by crocheting it into the starting chain. Insert your crochet hook into the chain stitch from front to back, ensuring the tip of the hook passes through the center of the V shape. Alternatively, for a cleaner edge, you can opt to work into the back bumps of the chain by turning it over.
It’s your choice! Commence Row 1 by starting in the third chain from the hook and crafting 124 half double crochet stitches (DC). Remember, the turning chain does not count as a stitch. Alternatively, more seasoned crocheters may prefer to initiate with foundation half double crochet (fhdc) stitches rather than a traditional starting chain. If so, create 124 FHDC.
Row 2: Proceed to the second row by executing a regular half double crochet in the first and last stitches, while working hdc-blo (back loop only) in all other stitches across the row. Chain 2 to kick off Row 2 (this chain does not count as a stitch). Begin with 1 hdc in the first stitch, followed by 122 hdc-blo. Complete the row by making 1 DC in the last stitch. Turn in your work. (124 sts)
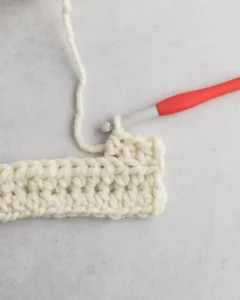
Row 3–10: Maintain continuity by repeating the pattern established in Row 2 for the subsequent rows. Chain 2 at the start of each row (remember, this chain does not count as a stitch), then proceed with 1 hdc in the first stitch, followed by 122 hdc-blo. Conclude each row with 1 dc in the last stitch. Turn in your work. (124 sts)
Note: The width of your scarf can be adjusted by crocheting more or fewer rows.
Finishing: Upon reaching the final row, trim the yarn and secure it. Thread a crochet needle or a blunt-tipped tapestry needle with the yarn tails and weave them in to conceal the ends. Congratulations! You’ve now completed this straightforward scarf pattern.